JMRI: DecoderPro User Guide
Advanced Decoder Definitions
This page provides information on advanced features in the decoder definition files for the DecoderPro Symbolic Programmer.
Formatting on the page
You can do limited formatting on the display using HTML formatting tags.You can embed HTML in pane text, but it must be enclosed in <html>...</html> tags.
This is made a bit tricky because of overlap between "tags as part of XML structure of decoder file" and "HTML tags included in the decoder file". All HTML tags need to be quoted, with their < and > characters replaced by the < and > strings and any embedded double quotes being replaced by ".
For example:
<label label="<html><strong>JMRI 3.7.2 or later is required to use this definition.</strong></html>"/>After the XML is read, the contents of that label will be displayed from the text in the "label" attribute, which is:
<html><strong>JMRI 3.7.2 or later is required to use this definition.</strong></html>and will appear on the screen as
JMRI 3.7.2 or later is required to use this definition.
For more examples see xml/decoders/esu/v4readMePane.xml.
This provides only HTML5 support, so if something isn't displaying as you expect, see if an approach using simpler HTML will work.
Identification
When "Read Type from Decoder" is used to determine the correct decoder definition file, several pieces of information are read from the decoder and used to attempt a match to a family and model:- Manufacturer:
- Numerical value from CV8, which is then matched to a name using the entries in the xml/decoderIndex.xml file.
- Version code:
- Numerical value from CV7, which is then matched to model name(s) using the lowVersionID and highVersionID values on model elements within all decoder definitions for the specific manufacturer. This is a complex process that doesn't always go well due to duplicate values, etc.
- Product ID code:
-
Originally a numerical value read from a manufacturer-specific CV or CVs; this only works
for certain manufacturers. The read process is handled in the code (the jmri.jmrit.decoderdefn.IdentifyDecoder class) and has to be updated each
time a manufacturer starts providing values in one or more new CVs. When the product code
is present, it should break any degeneracy between overlapping CV7 values within a
decoder family. For example:
  <decoder>
    <family name="My Decoder Family" mfg="NMRA">
      <model model="Model A" lowVersionID="16" highVersionID="23" productID="400" />
      </model>
      <model model="Model B" lowVersionID="21" highVersionID="27" productID="401" />
      </model>
    </family>
    …
  </decoder>
Some decoders can have multiple possible stored Product IDs for otherwise-identical decoders. In this case multiple comma-separated values can be specified in the Product ID field and a match to any value in the list will identify the decoder uniquely. For example, the ESU series usesthe RailCom® Product ID CVs, but the Product ID is updated for various production batches of the same model:
  <decoder>
    <family name="ESU LokSound V4.0" mfg="Electronic Solutions Ulm GmbH" lowVersionID="255" highVersionID="255">
      <model model="LokSound V4.0" numOuts="92" numFns="40" extFnsESU="yes" productID="33554493,33554503,33554538">
      </model>
      <model model="LokSound V4.0 M4" numOuts="92" numFns="40" extFnsESU="yes" productID="33554500,33554536">
      </model>
    </family>
    …
  </decoder>
Warning: Do not use multiple possible stored Product IDs for similar decoders that need different conditional expansion. It will not work, for reasons explained in a section below. In this case, each Product ID must be assigned a different model name, as in the first example above.
Support is also being added to find this value using the LocoNet SV2 protocol some time during the JMRI 4.1 release series. See the release notes for more info on the progress.
Since the product code works with the include/exclude operations described below, you can also use it in cases where there's no CV or CVs that contain it. In that case, no automated ID is done, but the value from the productID attribute of the user-selected model is used during later processing and expansion of the decoder definition. Alphanumeric productID values are sometimes used for this to avoid conflicts with the numeric ones found in CVs.
When a decoder model is selected, either manually or as the result of the identification process, the family and model names are stored in the roster entry being created and are used for future linkage of a roster entry to a decoder definition.
It is important to note that the Manufacturer, Version Code or Product ID are not stored in the roster entry, as the values are not reliably determined in some instances (e.g. manual selection, firmware update by manufacturer-supplied software, updated ID information from vendor). This has implications for when the decoder definition is expanded for programming (Conditional Decoder Definitions) or updated (Updates and Migration).
Public-domain and DIY decoders
Since JMRI 4.11.5The "Read Type from Decoder" feature is available for Public-domain and DIY decoders.
Three identifiers are used to identify the decoder:
- Manufacturer:
- Numeric value CV8 = 13 according to the NMRA standard S-9.2.2. file.
- Version code:
- The numeric value from CV7 where the software version is stored.
- Product ID code:
-
Numeric value stored in CV47, CV48,
CV49 and CV50 according to NMRA standard S-9.2.2 file
and reserved for use by the manufacturer.
Product ID is calculated using the following formula:
- Product ID = (((CV47 * 256) + CV48) * 256 + CV49) * 256 + CV50
Individual CVs have the following meaning:
- CV47 - country code, for example CV47 = 1 for the Czech Republic
- CV48 - developer or group of developers code, such as CV48 = 1 for dccdoma.cz
- CV49 - third ProductID for further identification
- CV50 - fourth ProductID for further identification
The corresponding decoder definition xml file has a filled <family> element. Example:
  <decoder>
    <family name="dccdoma.cz" mfg="Public-domain and DIY" >
      <model model="UNI16ARD-NAV" lowVersionID="41" productID="16843010" …  />
    </family>
    …
  </decoder>
The individual attributes of this element must be filled in as follows:
- mfg="Public-domain and DIY" that matches CV8
- lowVersionID="nn" highVersionID="mm" that matches CV7
- productID="nnnnnn" that matches CV47, CV48, CV49 and CV50
The name of the xml file with the definition of the decoder should have the following structure:
Public_Domain_family-name_model-model.xml
Where each part of a file name has the following meaning:
- Public_Domain that matches attribute <family mfg="Public-domain and DIY" >
- family-name that matches attribute <family name="developer" >
- model-model that matches attribute <model model="decoder name" >
Example of a definition decoder file for signal decoder UNI16ARD-NAV.xml from the developers group dccdoma.cz who are from the Czech Republic Public_Domain_dccdoma_UNI16ARD_NAV.xml.
For the new country code and new developer code, please contact Groups.io jmriusers https://groups.io/g/jmriusers.
Pane Considerations
Programmer panes are used to split and organise decoder variables into convenient named categories.- JMRI provides a standard set of panes, defined by <pane> elements included in the <programmer> element of each of the standard Programmer files (Basic, Comprehensive, Advanced, etc.) in the xml/programmers/ folder.
- Decoder definition files can contain custom panes for particular decoders or families of decoders, defined by <pane> elements included in the <decoder-config> (top-level) element of the decoder file.
- Pane names are specified by a <name> element at the top of each <pane> element.
Pane Replacement
Custom panes are usually added to definition files for one of the following reasons:- The items to be shown do not fall into any of the categories defined by the standard
pane names.
- In this case the pane <name> element should be different from any existing standard names.
- The new custom pane will be added at the end of the pane list.
- The applicable standard pane category does not have the correct layout or number of
variables.
- In this case the pane <name> element should exactly match the existing standard pane <name> element.
- The new custom pane will replace the existing same-named standard pane.
Empty Panes
Empty panes are defined as those with no active variable elements to display for the selected decoder. They may still contain text content.Pane Visibility
Pane visibility is governed by a complex set of rules:- Irrespective of all other rules, a pane will not show if it fails any "include" or "exclude" attributes in its <pane> element.
- Empty pane visibilty is controlled by the following, in increasing order of priority:
- The Preferences->Roster->Programmer->Show Empty Tabs setting.
- If present, a showEmptyPanes attribute in the current programmer XML file.
- If present, a showEmptyPanes attribute in the specific decoder defintiion XML file.
As a special case, the suppressFunctionLabels and suppressRosterMedia
attributes on the decoder-config element can be used to suppress the
Function Labels and Roster Media panes respectively whether or not they are empty.
- Whether a specific empty pane (as defined in Empty Panes above) shows also depends on
the pane type:
- If the empty pane is a standard pane (as defined in Pane Considerations above), it will only show if showEmptyPanes is in force. However, its usual contents will be replaced by a generic message explaining that the pane is unused since the contents are inapplicable or appear on another pane.
- If the empty pane is a replacement pane (as defined in item B of Pane Replacement above), it will only show if showEmptyPanes is in force.
- If the empty pane is a custom pane (as defined in item A of Pane Replacement above), it will always show, irrespective of whether showEmptyPanes is in force.
Best Practice
Advanced users may choose to hide empty panes, but Show Empty Tabs is enabled by default so beginner users need to see why panes are empty or where to find items not on the expected panes.The recommended best practice is:
- Where possible, items should use the existing standard panes.
- Where a particular existing standard pane does not suit in terms of number of items or
layout:
- Create a replacement pane with the same name as the existing standard pane.
- For examples, see the Advanced and Sound panes of the ESU_LokSoundV4_0 decoder definition.
- Where an existing standard pane does not suit in terms of concept:
- Create one or more new custom panes with unique descriptive names.
- Create information-only (no variable display elements, just text) replacement panes with the same names as any existing unused standard panes. Use these panes to explain why each pane is unused and/or where to find the information a user may reasonably expect to find on this pane. Use HTML formatting to enhance the display of these explanatory panes.
- For examples, see the Lights and Sound Levels panes of the ESU_LokSoundV4_0 decoder definition.
- Information-only custom panes will always be displayed.
In some cases, e.g. a non-locomotive decoder for servos where none of the locomotive-decoder panes make sense so the decoder definition contains lots of custom panes, it's a simplification to put a showEmptyPanes="no" attribute in the <decoder-config> element of the definition XML and just hide all those empty panes by default.
Including Fragment Files
Common parts of decoder definitions can be placed into "fragment files", which can then be included into multiple decoder definition files. This makes it easier to maintain and update those common definitions, e.g. to translate them into other languages.By convention, we these fragment files in subdirectories:
- xml/decoders/nmra
- The NMRA definitions for CVs, used by many decoder types
- xml/decoders/(mfg)
- Manufacturer-specific variables, for example xml/decoders/esu
<xi:include href="http://jmri.org/xml/decoders/nmra/shortAndLongAddress.xml"/>The program searches for those fragment files first in the preferences directory, then in the program directory. The full path must be present, e.g. you need an xml directory that contains a decoders directory in your preferences directory for the fragment file to be found.
Use an existing file as an example for the top elements & format needed.
Updates and Migration
Sometimes, we replace a decoder definition with a better one. The old one is in use, but we'd like to move those users to the new one eventually. There are model-level attributes that can be added to the old (not the new) definition to facilitate that:
<model show="no" model="A4X" replacementModel="A4X" replacementFamily="Jan 2012">
When the user selects "Update Decoder Definitions" from the Debug menu on PanelPro
window or the Action menu in DecoderPro, all their existing roster entries that use a decoder
definition with replacementModel and/or replacementFamily defined will be updated to the specified
replacement decoder definition instead. This lets people keep using their old, comfortable decoder
definition (the old file remains in JMRI) until they decide to move forward to a new one.
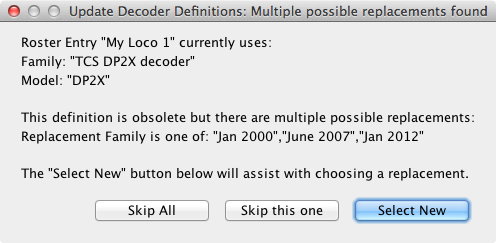
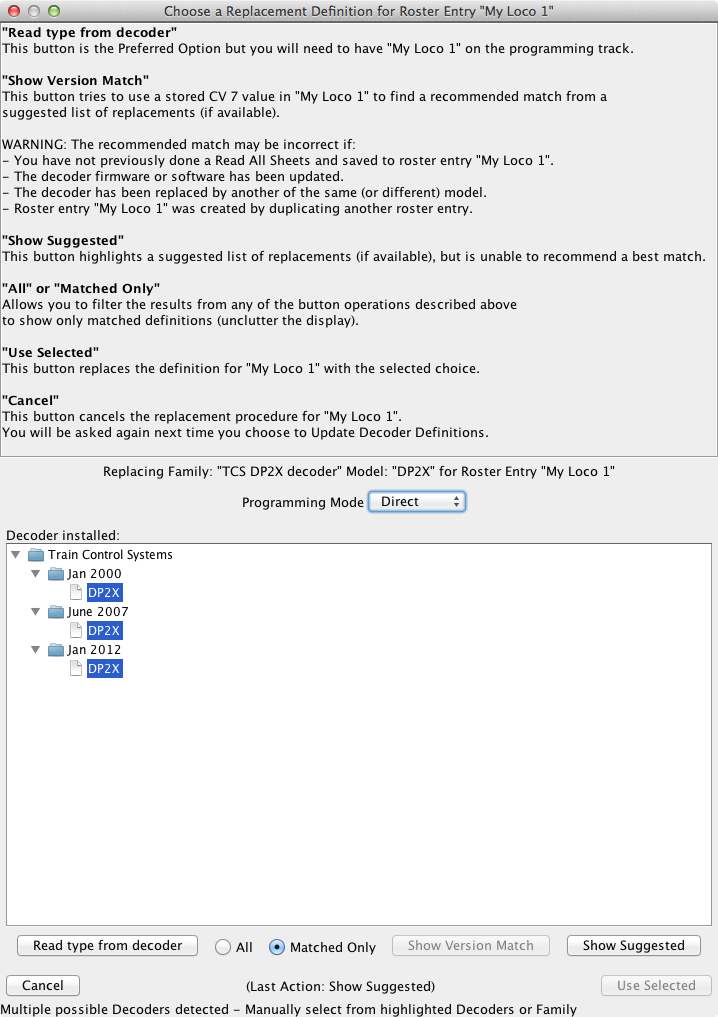
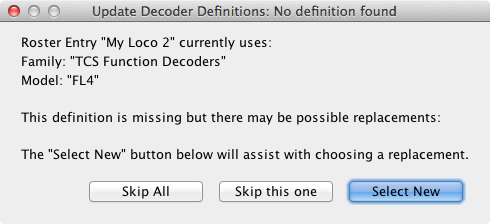
Note that an update defined this way is unconditional; if the family and model attributes match a roster entry, it will be updated to the new family/model. Automated conditional updates based on versionID or productID are not possible as these values are not stored in the roster entry. An interactive update process is now available in these cases and uses a special syntax: Since JMRI 4.9.5
<model show="no" model="DP2X" numOuts="2" numFns="2" replacementFamily="query:Jan 2000|June 2007|Jan 2012">
A replacement field begining with the string "query:", optionally (preferably) followed by a vertical bar "|" separated list of possible replacements, triggers interactive user dialogs, containing further explanations and guidance for the user. Click here and here for typical samples of these dialogs. Missing decoder definitions will also be detected. Click here and here for more samples.
The model element "show" attribute helps ensure that new users starts with the new definition. Its possible values are:
- "yes" (default) - the traditional behavior, always show this model and the family it contains
- "no" - never show this model, even if it matches a possible selection. Used for legacy (old) definitions that have been replaced with newer ones.
- "maybe" - only show if it matches a (possible) automatic identification.
- Decide where you want the new model defined. It has to have either a new model name, a new family name (new file) or both.
- Create your definition.
- Add "replacementModel" and "replacementFamily" attributes to the old definition.
- Generally, set the "show" attribute in the old definition to "no". The only exception to this is when some users will want to select the old definition still for a new decoder, perhaps because automatic identification can tell the uses of the old definition from the new one. (E.g. you're splitting the old definition into two parts because a new locomotive version exists)
Programming Capabilities
Some decoders can do extra programming operations, for example bypassing limitations on CV programming in the command station. "Capability" elements are used to tell DecoderPro about these.Access to High CV addresses
Certain command stations can only access up to CV 256 or CV512. Some decoder manufacturers have built in mechanisms to bypass this. For example, some ESU decoders can use writes to various CVs to access high-address CVs. To tell DecoderPro that a decoder can do this, use an element like:
  <capability>
      <name>High Access via Double Index</name>
      <parameter name="Max Regular CV address">256</parameter>
      <parameter name="High Address CV">96</parameter>
      <parameter name="Low Address CV">97</parameter>
      <parameter name="Access Register CV">99</parameter>
      <parameter name="Modulo">100</parameter>
  </capability>
The parameters must appear in the order shown. They mean:
- "Max Regular CV address" - CV addresses equal or below this don't use this mechanism. (The mechanism won't be used if the command station can directly read/write the CV being requested, but even if it can't, this mechanism won't be used below this value)
- "High Address CV" - The high part (see Modulo) of the CV address is written here at the start of the operation
- "Low Address CV" - The low part (see Modulo) of the CV address is written here as the 2nd part of the operation.
- "Access Register CV" - after the address values are set, this is the CV that's read or written to read or set the desired real CV.
- "Modulo" - value used to split the real CV address between the high and low address CVs.
For example, to write 21 to CV 614 with the values shown, DecoderPro will:
- Write 6 =(614/100) to CV 96 for the high address part
- Write 14 = (614 mod 100) to CV 97 for the low address part
- Write 21 to CV 99 to do the actual CV write
For an example of where to position this capability element in the file, etc., see the xml/decoders/ESU_LokSoundV4_0.xml file.
Another approach, used by e.g. Zimo, is to provide a way to page the access. For example, to write 21 to CV614 with one of these, you need to:
- Write 60 =(614/100)*10 to CV 7 for the high address part
- Write 21 to CV 14 (614 mod 100) to do the actual CV write
  <capability>
      <name>High Access via Partial Index</name>
      <parameter name="Max Regular CV address">100</parameter>
      <parameter name="High Address CV">7</parameter>
      <parameter name="High Address Multiplier">10</parameter>
      <parameter name="Modulo">100</parameter>
  </capability>
Note that it has a different "name" value. That's what selects the different algorithm needed
here.
The parameters must appear in the order shown. They mean:
- "Max Regular CV address" - CV addresses equal or below this don't use this mechanism. (The mechanism won't be used if the command station can directly read/write the CV being requested, but even if it can't, this mechanism won't be used below this value)
- "High Address CV" - The high part (see Modulo) of the CV address is written here at the start of the operation
- "High Address Multiplier" - This multiplies the high part of the CV address before it's stored to the High Address CV. For example, putting a 10 here will store the high address part in the "10's digit" of the High Address CV.
- "Modulo" - value used to split the real CV address between the high and low address CVs.
Another approach used by e.g. Zimo uses a page register that has to be reset afterwards. For example, to write 21 to CV614 with one of these, you need to:
- Write 260 =(614/100)*10+200 to CV 7 for the high address part. The "200" is an indicator to use this mode.
- Write 21 to CV 14 (614 mod 100) to do the actual CV write
- Write 0 back to CV7 to reset the indexing.
  <capability>
      <name>High Access via Partial Index with Reset</name>
      <parameter name="Max Regular CV address">100</parameter>
      <parameter name="High Address CV">7</parameter>
      <parameter name="High Address Multiplier">10</parameter>
      <parameter name="Modulo">100</parameter>
      <parameter name="Indicator">200</parameter>
  </capability>
The parameters must appear in the order shown. They mean:
- "Max Regular CV address" - CV addresses equal or below this don't use this mechanism. (The mechanism won't be used if the command station can directly read/write the CV being requested, but even if it can't, this mechanism won't be used below this value)
- "High Address CV" - The high part (see Modulo) of the CV address is written here at the start of the operation
- "High Address Multiplier" - This multiplies the high part of the CV address before it's stored to the High Address CV. For example, putting a 10 here will store the high address part in the "10's digit" of the High Address CV.
- "Modulo" - value used to split the real CV address between the high and low address CVs.
- "Indicator" - value added to the value being stored to High Address CV to tell the decoder to use this mode.
Accessory Decoder Ops Mode
Certain accessory decoders require special programming packets to configure their CVs from the DCC track signal. The capability to do that is written:
  <capability>
      <name>Ops Mode Accessory Programming</name>
      <parameter name="Address Type">decoder</parameter>
      <parameter name="Delay">200</parameter>
  </capability>
The "Address Type" parameter is optional:
- If it is "decoder" or omitted, the current address is interpreted as a 9-bit accessory decoder address.
- If it is "accessory" or "output", the current address is interpreted as an 11-bit accessory output address.
- If it is "signal", the current address is interpreted as an 11-bit signal decoder address.
- If it is "altsignal", the current address is interpreted as an 11-bit signal decoder address, using an alternative interpretation of NMRA standard 9.2.1).
- If it is "legacy", the current address is interpreted as a 9-bit address (as for "decoder") but a "legacy" programming packet (as per Appendix A of NMRA standard 9.2.1) is sent.
Note that this only works for ops-mode writes; these particular NMRA DCC packets do not perform read operations, nor do they work in the service mode (programming track).
Note an element:
  <variable … item="Short Address" …>
      …
  </variable>
or:
  <variable … item="Long Address" …>
      …
  </variable>
is required so the Ops Mode programmer has an address to use. Either form functions identically.
The "Address Type" parameter is the only way to specify whether the address is 9-bit or 11-bit.
For a working example, see the xml/decoders/ESU_SwitchPilot.xml file. In the case of this example decoder, the address is stored in CVs 1 and 9 as per NMRA standard 9.2.2.
Ops Mode Delayed Programming
Most locomotive decoders accept special programming packets to configure their CVs from the DCC track signal (Programming on Main).
However these packets take time to process and if subsequent packets are sent too soon they can be missed. The capability to do add a delay after programming each CV is written:
  <capability>
      <name>Ops Mode Delayed Programming</name>
      <parameter name="Delay">500</parameter>
  </capability>
The "Delay" parameter specifies a minimum delay (in milliseconds) between successive writes.
Some decoders miss commands if the delay is too short. If this is parameter is omitted, the default
delay is 500 milliseconds.
Note that this only works for ops-mode writes; these particular NMRA DCC packets do not perform read operations, nor do they work in the service mode (programming track).
Note also that this particular capability only works for multi-function decoders. Accessory decoders need to use the Accessory Decoder Ops Mode capability, which has its own "Delay" parameter.
Indexed CV Access
To access indexed CVs, include this capability element:
  <capability>
      <name>Indexed CV access</name>
      <parameter name="PI">31</parameter>
      <parameter name="SI">32</parameter>
      <parameter name="cvFirst">false</parameter>
      <parameter name="skipDupIndexWrite">true</parameter>
  </capability>
If cvFirst is true, the format is CV.PI or CV.PI.SI as used by QSI. If it's false, the format is PI.CV or PI.SI.CV as used by ESU.
Alternately the PI and/or SI CV numbers can be set by using a "nn=nn" syntax when specifying PI and/or SI. For example, using a cvFirst false syntax, "101=12.80" sets CV101 to 12 before accessing CV 80, regardless of the PI value configured into the capability.
If skipDupIndexWrite is true, certain writes to the PI and SI CVs can be skipped if the user selects skipping them. This speeds up access. Some decoders require that the CVs be written for each operation, in which case this should be set to false. The default is true.
In some cases, you want to reset the PI and SI values after the indexed CV is read or written. To do that, put the new values after a semicolon: 11.12.123;0.1 for example. Note that this only works when both PI and SI are being written; the case where just PI is used has not been programmed yet.
If both this and the "access to high CV" capabilities are present, this one should be listed second.
For an example of where to position it etc., see the xml/decoders/ESU_LokSoundV4_0.xml file.
TCS WOW decoder access
The TCS WOW decoders use several unique (to say the least) CV access methods. JMRI accommodates them via a special capability element:
  <capability>
      <name>TCS 4 CV access</name>
  </capability>
This provides two custom CV formats:
- T2CV.11.12
- Writes 11 to the first index CV (201), 12 to the 2nd index CV (202), then does write/read/confirm operations on CV 203 and 204
- T3CV.11.12.13
- Writes 11 to the first index CV (201), the data to the 2nd index CV (202), then writes 12 to CV203 and 13 to CV204.
Masks - inserting variables into part of a CV
A mask attribute declared in a variable definition is a pattern to control which part in a CV contains our variable. Masks can be applied to a single CV, i.e. a decVal or enumVal type, or to multiple CV's like splitVal.JMRI supports 2 mask types:
A string like XXXVVVXX where each "V" is a bit that's included, and "X"
is a bit that's not to be included. It's best to have eight characters, as that makes it clearer
what's going on. If the variable is a full byte, this attribute can be omitted.
Generally, the V characters should be a contiguous block of bits as specified in
the manufacturer's documentation for the decoder.
In certain rare cases, the layout of the decoder might require a different pattern like
XXVVXXVV, but in those cases please check the operation of the resulting decoder
definition carefully to make sure it does what you want.
A second mask
pattern, Radix, is useful in cases where instead of bits, digits, triplets or some other unit
make up a pattern such as 1234C where "1234" is a turnout address and "C" is some other variable.
To define the address part, you would use:
mask="10" as an attribute in the variable element (that is the base where our part starts, at
the 'tens') and
max="10000" in the value element (to reserve 10^4 values for 4 digits).
For example:
  <variable CV="11" item="Address" mask="10">
    <decVal min="0" max="10000"/>
    <label>Address:</label>
  </variable>
A Radix mask can handle CVs that are coded in bases other than binary: Ones that store their parts
as decimal digits (as our example), or even base 3 or 5. That's a bit more technical, it's rarely
needed, but if you do need it, refer to the javadoc for
more details. The Uhlenbrock_63410 definition
provides an example on CV1. The decoder definition using a Radix mask should point to /schema/decoder-4-15-2.xsd.
Split Variables - spread over multiple CVs
Since JMRI 4.15.5Some decoders use variables that are spread over multiple CVs, contiguous or not.
A number of types are provided to handle this situation:
- A splitVal type. This handles a numeric value stored across multiple CV's
(tested for up to 8 CVs).
- For examples, see splitVal example below and this decoder fragment file.
- For details of required/optional attributes and advanced features, see this JavaDoc page.
- A splitHexVal type. This is like splitVal
but with the number entered and displayed in hexadecimal. An optional "case=" attribute can
be used to force the number to be displayed in "upper" or "lower" case.
- For examples, see this decoder fragment file.
- For details, see this JavaDoc page.
- A splitDateTimeVal type. This is like splitVal but the number displayed represents a Date and/or Time value.
- For examples, see this decoder fragment file.
- For details of required/optional attributes and advanced features, see this JavaDoc page.
- A splitTextVal type. This is like splitVal
but allows the entry, storage (in CVs) and display of text strings. The number of CVs
allocated by the user in the definition governs the maximum string length.
- For examples, see this decoder fragment file.
- For details of required/optional attributes and advanced features, see this JavaDoc page.
- A splitEnumVal type. This is like splitVal
but uses the selection of one object from a specified list.
- For examples, see this decoder file.
- For details of required/optional attributes and advanced features, see this JavaDoc page.
The CVs to be used are specified in the CV attribute and masks (if required)
in the mask attribute.
Both CVs and masks are specified lowest-value first order:
The least
significant bit of the value will be in the first CV and mask specified, and the most
significant bit of the value will be in the last CV and mask specified.
For example:
  <variable CV="1,27,13" mask="XXVVVVVV XXXXXVVV XXXXXVVV" item="Sample Item">
      <splitVal/>
  </variable>
puts the least significant 6 bits of the value in CV1, and the most significant
three bits in CV 13.
In cases where a number of complex or contiguous CVs are used, there are a number of
alternative more concise methods of specifying in the CV variable parameter:
- The available methods (with example strings) are detailed under expandCvList on this JavaDoc page.
- For example, this decoder fragment file has a splitTextVal requiring 28 CVs.
- Other examples are found in this decoder fragment file.
- The following example reads the RailCom® Production Date as per NMRA standard 9.3.2 from 4 contiguous indexed CVs.
  <variable CV="0.255.269:4" readOnly="yes" item="PDate">
      <splitDateTimeVal display="dateOnly" base="2000-01-01T00:00:00"/>
      <label>Production Date</label>
  </variable>
Note that if only one mask is specified, it will apply to all CVs. If fewer masks than
CVs are specified, the last mask will apply to the remaining CVs.
splitVal example - "long" addresses over 2 CVs
Some decoders, mostly accessory decoders, are using "long" addresses that are split over 2 CVs, contiguous or not.
CV1 and CV9 are standardized by NMRA for accessory decoders primary address, see NMRA standard 9.2.2.
Long addresses can be accessed via "splitVal" type, as in the following example:
  <variable CV="1,9" mask="XXVVVVVV XXXXXVVV" item="Short Address" default="1" minOut="1">
      <splitVal/>
      <label>Accessory Address</label>
  </variable>
- CV1 is the Least Significant Byte (LSB) of the address and contains the six least significant bits of the accessory decoder's address in bits 0-5.
- CV9 is the (Most Significant Byte) MSB of the address and contains the three most significant bits of the accessory decoder's address in bits 0-3.
decVal/splitVal/splitHexVal - optional "factor" and "offset" attributes
For special purposes, decVal, splitVal and splitHexVal have two optional parameters, a "factor" and an "offset":
- Value to put in CVs = ((value in text field) - Offset)/Factor
- Value to put in text field = ((value in CVs) * Factor) + Offset
<splitVal factor="4" offset="-3"/>
For usage examples, see the xml/decoders/ESU_SwitchPilot.xml file.
Conditional Decoder Definitions
To reduce the number of decoder definition files needed, each file can contain definitions for multiple decoder models. JMRI provides ways of adapting the definition to specific models both when the file is being initially expanded for use, and later while the program is working on the definition. These are particularly useful when using a common fragment file that might be included by multiple decoder definition files (defining different-but-similar families)Include/Exclude During Variable Expansion
Whether a variable element is expanded and used can be made conditional on the decoder type using "include" and "exclude" attributes on <variables>, <variable>, <enumChoice> and <enumChoiceGroup> elements.A variable definition will not be expanded and used:
- If an exclude attribute is present, neither the decoder's product ID, model name, nor family name is found in the exclude list.
- If an include attribute is present, at least one of the decoder's product ID, model name, or family name is found in the include list.
Example:
  <variable label="My Variable" CV="72" include="ModelA,400">
    <decVal/>
  </variable>
The variable above will only appear when expanding the decoder definition for ModelA or
product ID 400.
Note there should be no spaces around the comma.
You can also put include and exclude attributes on individual choices in an enumeration-type variable. This can be used to e.g. only include specific lighting options in certain decoder families.
Attributes on a <variables> element act on all the <variable> elements within it, along with any include or exclude attributes on those individual variables.
You can also use the include mechanism to specify the default value of a variable.
Note: <defaultItem> must be the first element inside the <variable> element body.
Example:
  <variable label="My Variable" CV="72" default="3">
    <defaultItem default="12" include="815"/>
    <decVal/>
  </variable>
This will set the default (initial) value of the CV to 12 if the "815" matches, and otherwise use the default-default of 3. You can have as many <defaultItem> elements as needed; the first one that matches is used.
Note: any <defaultItem> elements must come before other elements inside the <variable> element.
Include/Exclude During Pane Creation
Whether a pane (or part of a pane) is created can be made conditional on the decoder type using "include" and "exclude" attributes on <pane> and <group> elements.A pane will not be created:
- If an exclude attribute is present, neither the decoders product ID, model name, nor family name is found in the exclude list.
- If an include attribute is present, at least one of the decoders product ID, model name, nor family name is found in the include list.
Example:
  <pane include="ModelA,400">
    ...
  </pane>
"My Pane" will be created only when expanding the decoder definition for ModelA or product ID 400.
You can also create a <group> element with include and exclude attributes. Elements within the <group> will be created only if the <group> conditions are met. This can be used to e.g. display specific text labels only for certain decoder models.
Example:
  <group include="ModelA,400">
    <label>
      <text>These decoders are very old.</text>
    </label>
    <label>
      <text>Some features are unavailable.</text>
    </label>
  </group>
The text will be created only when expanding the decoder definition for ModelA or product ID 400.
Warning Regarding Use of Product ID in Include/Exclude
Care must be exercised when attempting to match against product ID in include or exclude attributes. The product ID is not matched against any value read from the decoder during identification but against the productID attribute specified in the decoder definition. This can particularly be a problem if the productID attribute has multiple values. For example:
  <decoder>
    <family name="My Big Family" mfg="NMRA">
      <model model="My Model" productID="400,401" />
      </model>
    </family>
    …
  </decoder>
  <pane label="My 400 Pane" include="400">
    …
  </pane>
  <pane label="My 401 Pane" include="401">
    …
  </pane>
Both panes will always be created. If the definitions need to differ between
product IDs, you will need to create two models, as per the first example under
Identification.
Run-time Qualification of Variables
Qualifying Variables
A "qualifier" element on a variable element allows you to enable or disable the variable depending on the current value of another variable. This can be useful if, for example, the decoder has a "mode" CV that determines the meaning of other CVs.If a variable is qualified as inactive, it doesn't appear in any panes and is neither read nor written to the decoder when you do "All" or "Changes only" read or write operations. The value is saved to the roster and will be reloaded when the roster entry is reopened later.
In the following example, a CV is interpreted as two different variables depending on whether the decoder is set for short or long addressing.
  <variable label="Variable for Short Address" CV="11">
    <qualifier>
      <variableref>Address Format</variableref>
      <relation>eq</relation>
      <value>0</value>
    </qualifier>
    <decVal/>
  </variable>
  <variable label="Variable for Long Address" CV="11">
    <qualifier>
      <variableref>Address Format</variableref>
      <relation>eq</relation>
      <value>1</value>
    </qualifier>
    <decVal/>
  </variable>
Other available operators include "gt", "ge", "ne", "lt", "le" and "exists". The "exists"
operator checks for whether a variable is defined or not; a "1" value means that it is, and a "0"
means that it doesn't.
If multiple qualifier elements are present, all must be true for the variable to be active and displayed.
Qualifying Panes
A "qualifier" element on a pane element allows you to enable or disable the pane depending on the current value of a variable.If a pane is qualified as inactive, its contents are no longer shown. This includes any labels or other decorations on the pane, in addition to the variables it contains. Depending on other options, the pane may either show as empty, or not show at all. The variables within it are still active, though, and a "Read all sheets" or "Write all sheets" will still write them. If you have overlapping variable definitions, consider carefully whether this is what you want. You might need to qualify the individual overlapping variables.
The following example enables one of two panes depending on whether the decoder is currently set for short or long addressing.
  <pane name="Short Only">
    <qualifier>
      <variableref>Address Format</variableref>
      <relation>eq</relation>
      <value>0</value>
    </qualifier>
    <column><row>
      <label label="Short Only Pane"/>
    </row></column>
  </pane>
  <pane name="Long Only">
    <qualifier>
      <variableref>Address Format</variableref>
      <relation>eq</relation>
      <value>1</value>
    </qualifier>
    <column><row>
      <label label="Long Only Pane"/>
    </row></column>
  </pane>
Other available operators include "gt", "ge", "ne", "lt" and "le".
If multiple qualifier elements are present, all must be true for the pane to be active and displayed.
Qualifying Elements on Panes
A "qualifier" element on a "label", "soundlabel", "row", "column", "grid" or "griditem" element allows you to enable or disable the display of that element on a specific pane.The following example displays a warning label if a version-number variable has a too-low value:
  <label label="Version number too low!">
    <qualifier>
      <variableref>Version Number</variableref>
      <relation>lt</relation>
      <value>3</value>
    </qualifier>
  </label>
You can use the same qualifier for multiple elements by enclosing the elements in a "group" element and adding the qualifier to the "group" element:
  <group>
    <qualifier>
      <variableref>Version Number</variableref>
      <relation>lt</relation>
      <value>3</value>
    </qualifier>
    <label label="Version number too low!"/>
    <label label=" "/>
    <label label="Please update."/>
  </group>
Once you've read the Version Number (variable or CV) from the decoder, the label(s) will display iff that version number is too low. Note that initially, before the values are read from the decoder, this display will depend on the default value from the file, which might be misleading to the user.
Using XSL transformations
It is possible to generate complex, repeated decoder XML parts using XSL stylesheets. For more information, please see Use XSLT Transformation for complex decoders.