Warrants: The Warrant List
The Warrant List is a table of all Recorded Warrants. It also temporarily lists NX Warrants during the time they are in effect. The Warrant List window is a dispatchers sheet to run and control warranted trains.
You access the Warrant Table by selecting Warrant List from the Warrants menu of your Control Panel. For an overview discussion of Warrants, see Warrants.
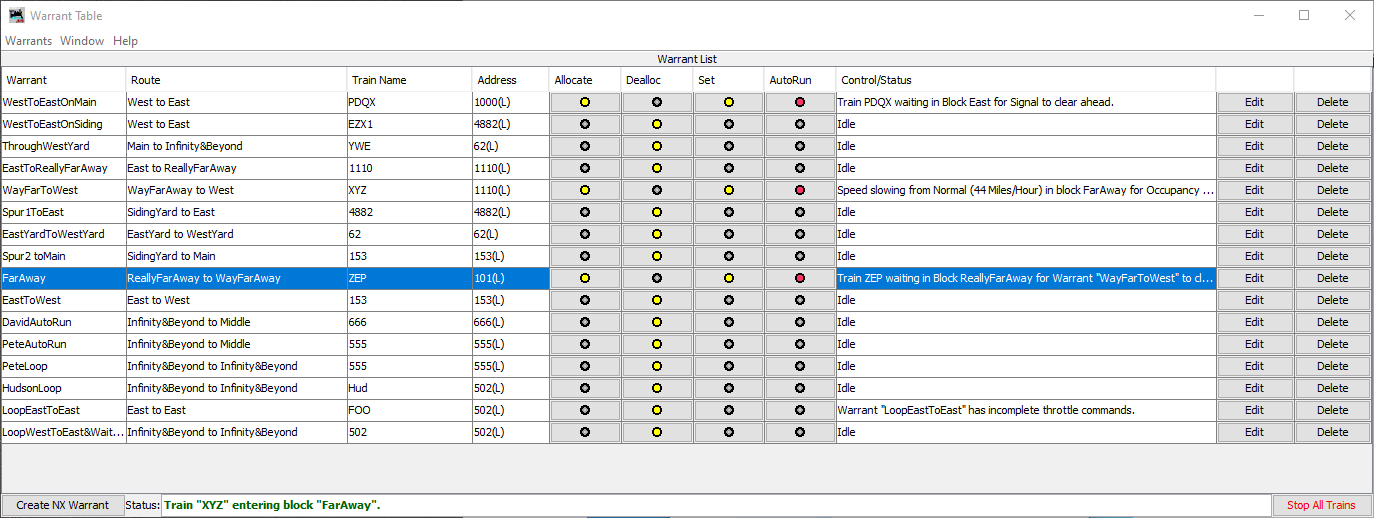
Columns in the Warrant Table
- Warrant - The name of the Warrant.
- Route - The route of the Warrant is listed in a drop down combo box by clicking the table cell.
- Train Name - The Train Id, as stated in the Roster. This cell can be edited and its content is displayed next to the Indicator Track Icons when the train occupies their OBlock (the Edit popup of Indicator Track Icons have a checkbox to enable this function).
- Roster ID/Address - The Roster Id or Address of the locomotive or Consist. since 4.25.1 This cell can be edited to correspond to the current motive power of the Train. If the DCC address is entered, the entry will show the corresponding Roster Id. If the address is not found in the roster, the address is bracketed with the $ sign.
- Allocate - A button that reserves the route for the Warrant. The Indicator Track Icons of the blocks of the route display green but the turnouts are not disturbed.
- Deallocate - A button that removes the reservation for the Warrant.
- Set - A button that allocates and sets the turnouts for the Warrant route. The Indicator Track Icons of the route display green and the turnouts indicate the paths taken in the block.
- AutoRun - A button that runs the train over the route according to the throttle commands of the Warrant. The recorded speed of the train will be modified according to the occupancy and signal aspects encountered on the route. The Indicator Track Icons display the current position of the of the train with a blue color.
- ManRun - (hidden column) A button that allocates the Warrant and sets
the route for a manual operator to run the train. The script is not run, but the route is
displayed. of the train with a blue color.
(The default setting hides this column. To display it, right click the table header.) -
Control/Status - The status of the Warrant is shown. It also has a drop
down combo box that can send commands to a running train.
Note: This column has two functions - Status messages and control buttons.
When running, the Warrant will post a status message here; e.g. its current location and speed, error messages, etc.
When clicked the following commands can be sent: since 4.17.8- Halt - Ramp the train down to throttle speed 0 and suspend execution of the throttle command script
- Resume - Ramp the speed of the train up to its former setting and restart the throttle command script. Should obstacles be ahead, the a warning is posted.
- Increase Speed - The throttle setting is increased by one Ramp Step Throttle Increment (See Warrant Preferences).
- Stop - Set the throttle to 0% and suspend execution of the throttle command script
- Move into Next Block - Repeats the test for whether a signal aspect has changed or an occupied block ahead has cleared. If the train has overrun a block where it is expected to be and now appears to be the obstacle preventing movement, this resets its location. (Occasionally a sensor change can be missed due to a short or other hardware malfunction. This reset may allow a stopped train to continue.)
- Emergency Stop - Issue an emergency stop to the train and suspend execution of the throttle command script.
- Abort - Abort the script and deallocate the Warrant.
- Edit - A button that opens the window used for creating and editing warrants. This window has several display modes. In this case, it is opened in the mode where many of the warrants parameters can be edited while preserving its route. The Creating and Editing Warrants help page has information about editing a warrant.
- Delete - A button that deletes the Warrant.
Click in the table header to select columns to be hidden or visible.
The Warrant List Menus
The following item are under the Warrants menu.
- Concatenate Warrants - Join two Warrants together to become a single Warrant. The last block and path of the first Warrant must be equal to the first block and path of the second Warrant.
- Create New Warrant - Opens the window used for creating and editing warrants. This window has several display modes. In this case, it is opened in the mode to create a route for a new warrant. The Creating and Editing Warrants help page has information about creating a warrant.
- Train Trackers - Opens the Tracker Table window. The Train Trackers help page discusses how the movements of a train can be displayed as they move from one occupancy block to another.
- Create NX Warrant - Opens a window to create an eNtry/eXit Warrant. This is discussed in the NX Warrants Help.
- Open Session Log - Opens a window to name a file that records the Warrant and train tracking status messages to the file.
Other Warrant List Features
The following items are at the bottom of the window:- The Create NX Warrant button Opens a window to create an NX (eNtry/eXit) Warrant.
- The Stop all Trains button causes all running Warrants to halt their trains.
- The Status field contains the last 20 messages from Warrants. Click in the field to display them.
Running Automated Trains
The throttle commands recorded in a Warrant are played back to run the train, but additional control of the train can be done through the choices provided by the Control/Status down down combobox. Note there are two ways to stop the train: Emergency Stop an immediate stop or Halt that slows the train to a stop smoothly. Once stopped, the Resumecommand will restart it, keeping the Warrant in effect. Move into Next Block is "repair" command should the train overrun a block and become "Lost". This command aligns the Warrant to the next block and restarts the train. The Abort command does an emergency stop and annuls the Warrant.There are separate operations in the Warrant List table to reserve a Warrant route; the safer Allocate will not throw turnouts in blocks possibly occupied by trains or the Set (allocate and set turnouts). These operations do not have to be done before running an automated train. They are used to preview the route. An AutoRun operation can begin without them. The train will seek allocation and set turnouts as it proceeds on the route.
Automatic control of trains
Whenever a warranted train has permission to enter the next Block, the turnouts are reset to the route. This will correct any inadvertent setting of turnouts by other operators. If a warranted train does not have permission the enter a block, no turnouts for the route are thrown in the block or in the blocks beyond it."Stop" aspects of Signals, detection of occupancy or allocation to another warrant will deny permission for a warranted train to enter a block. Also, signals may prescribe speed restrictions. Whenever the train enters a block or is given a control command the warrant looks ahead for permission or speed restrictions. When this is detected, the warrant will suspend the warrant's throttle commands and issue throttle commands it calculates to ramp the train's speed smoothly to meet the required speed or stop just before entering the block.
When permission to enter a block is denied, a warranted train will not move. Clearing these conditions causing the a denial is cleared, the train will proceed automatically. The only thing that may override automatically proceeding is if the user has set the control to "Halt". The train will not move until the user sets "Resume".
Note: In order for warranted trains to respond to signal aspects, the Portals must be defined with Signal Heads or Signal Masts protecting the blocks they join, the train will modify the speed according to the appearance or aspect of the signal. When Warrant Speeds Are Modified has details about how Warrants modifyrecorded speeds.
When the Starting block is Unoccupied
If a Warrant is started and the starting block is not occupied, the Warrant will wait until the block is occupied. When occupation occurs the Warrant will is set to to wait for the user to use the "Resume" control to start the train. Note it is vital that the correct train occupies the starting block. The address specified in the Warrant, is the train that will begin moving.Back to Warrants Help.