Warrants: NX Warrants
An NX Warrant is a computer generated Warrant. Rather than recording speed changes and
other locomotive commands from a throttle where the recording notes the elapsed time between
commands, an algorithm generates the speed changes and elapsed times for a smooth start up
and slow down to a stop. To review information about Warrants see About Warrants.
In is necessary to know the Block Path lengths and the engine's speed characteristics in
order to determine correct time and position for where the speed changes should occur. A
speed profile for the selected engine/consist to provide track speeds is desirable. Lacking a
speed profile, the Throttle Factor and Layout Scale are used for a rough
estimate of track speed. If block lengths are not specified, you will be prompted to provide
a length. When Warrant Speeds Are Modified profides more
details about how Warrants modify recorded speeds.
Launching an NX Warrant
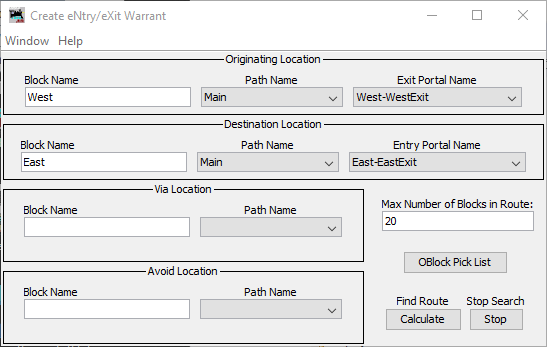
After selecting the menu item Create NX Warrant from the Warrants menu of the Control Panel Editor, or by clicking on the Create NX Warrant button in the Warrant List window, the Create eNtry/eXit Warrant window is displayed:
Set the Route
First establish the route for the train by entering OBlocks in the following fields:
- Choose an Origin block, a starting Path and Portal to exit the originating block.
- Choose a Destination block and a Path on which to end the route and Portal where is enters the block.
- (Optionally) Chose a Via block, that is, a block that route must include.
- (Optionally) Chose an Avoid block, that is, a block the route must not include.
Blocks are chosen either by typing in the block name or dragging it from a displayed OBlock table (use the OBlock Pick List button). The origin and destination blocks can also be chosen by clicking on track icons that represent these OBlocks. To use this feature your panel must have your layout depicted by Indicator Track Icons placed there by Circuit Builder.
To specify a Warrant route by mouse clicks, simply click on a track icon on your Control
Panel. The mouse clicks move successively through the Block Name fields of the Create
eNtry/eXit Warrant pane. If you mis-clicked on an icon and/or want to change the block in one
of the fields, just double-click the field and click on another icon.
Note that the icons must be Indicator Track Icons to have this feature. Creating and Editing Warrants also discusses choosing
routes.
The Max Number of Blocks in Route field puts an upper limit on the length of the route the algorithm computes. If your layout contains loops, then an infinite number of routes can theoretically be counted. To minimize computation time, you need not use a number that is much larger than the number of blocks in the longest route. However, using too small a number can terminate the search prematurely before the route is found.
Pressing the Calculate button runs a computer algorithm to determine all the intermediate blocks and paths to make the route. If more than one route meets the criterion, you are presented with a list to review and select the route you want. Note, the Via and Avoid location fields may be used to restrict the list. Possibly you will be presented with a dialog stating that no route could be found. You can view a tree of all the possible searches the algorithm used to find the route. Typical errors are the Portals of the selected paths are mismatched for exit and entry. Also check that the paths have the needed portals for exit and entry.
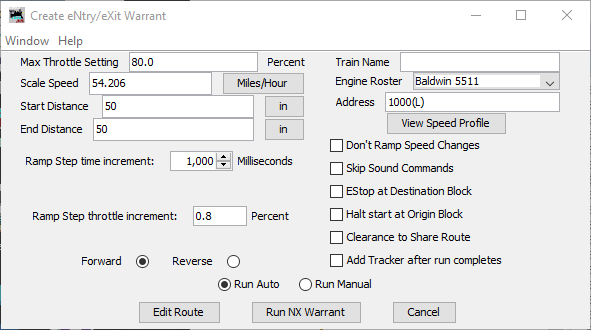
Once the route has been chosen, the window changes to show choices for the running
parameters of the NX Warrant:
Set the Run Parameters
The required fields are Address and Max Throttle Setting. All the others are optional or have defaults.
- Train Name - Indicator Track icons set to display train names will show this name when the train occupies the OBlock the icon represents. If left blank, the locomotive address or Roster Id is displayed.
- Engine Roster - Pick a train from the Roster from this drop down combo box. The locomotive address and train id will be displayed.
- Address - The decoder address of the locomotive of the train. This is a required field, but it will be displayed automatically if a train is selected from the roster. You may enter the DCC address of a non-Roster locomotive.
The View Speed Profile button displays a table of the track speeds that will be used in the calculations for the Warrant. The table is comprised of the Roster Speed Profile merged with any speed measurements that have been made during the current session. If the table is empty, the values for Throttle Factor and Layout Scale in Warrant Preferences are used in the calculations. (Note, this was the only way it was done prior to Release 4.9.2.)
Next set values for the maximum speed the train should achieve when track conditions are at a Clear aspect.
- Max Throttle setting Percent of full Throttle. Invalid entries will be discarded.
- Scale Speed or Track speed - The label depends upon the units you choose to express the train's speed. The "units" button cycles through the choices: Miles per hour, Kilometers per hour, millimeters per second, inches per second. If a speed profile exists. it is used to make the conversion to throttle setting percent. Otherwise the throttle factor settings of Warrant Preferences are used.
- Start Distance is the position of the train in the Origin block. Set the distance of the train's position to the exit portal of the origin block. You may choose either inches or centimeters for units.
- End Distance is the position where the train should stop in the Destination block. Set the distance from the entry portal of the destination block to the desired stop point. You may choose either inches or centimeters for units.
NXWarrants ramp up and ramp down the train speed in increments to provide a prototypical appearance when leaving the Origin block and ending in the Destination block. The parameters for the increments to use are set by the Ramp Step Time and Ramp Step Throttle fields.
Next, set the direction of travel. It is important to set this correctly because the throttle commands will correspond to track conditions. Be ready to issue an Abort command from Warrant List Table if this occurs.
- Radio buttons Forward and Reverse Set the direction of the locomotive.
On the right is a list of some options to consider for running the warrant.
- The checkbox Don't Ramp Speed changes Sets an option on how to change the speed when a signal or rogue occupation is detected ahead. The default is to incrementally slow the train before reaching the end of the approach block. Selecting the option will make an immediate speed change upon entering the approach block.
- The checkbox Skip Sound Commands Sounding the horn or whistle at the start and end of the NXWarrant are eliminated.
- The checkbox EStop at Destination Block to have the train make an emergency stop upon entering the last block. Rarely Needed.
- The checkbox Halt Start at Origin Block will allocate and set the Warrant, but won't start the train until you issue a Resume command to the Warrant from the Warrant List Table or via a Logix Warrant Control action.
- The checkbox Clearance to Share Route will allow another Warrant to acquire clearance to run ahead of the Warrant. The additional Warrant will cause this Warrant to halt and wait for occupation to clear ahead before resuming speed.
- The checkbox Add Tracker after run completes launches a tracker marker to follow the manual operation of the train after the warrant has finished.
An NX Warrant can be issued for a manual operator. Here the route is allocated but no throttle commands are issued. The operator must acquire the throttle and drive the train.
- Radio button Run Auto launches the Automated Warrant
- Run Manual allocates and sets the route for a manual operator. This is similar to setting a Tracker where the route is prescribed and highlighted on the layout.
At the bottom of the pane are three buttons:
- Edit Route to return to the choose route window.
- Run NX Warrant to allocate and run the Warrant
- Cancel to discard entries and close window.
The Script Algorithm
The NX Warrant script sets the direction, turns the light on, blows two horn/whistle blasts and starts to ramp up speed. There should be a reasonable estimate for block length know for each OBlock. If the length of the route is not known, you will be prompted to enter a length for the path through the block. The algorithm will ramp up to the maximum speed and ramp down to a stop in the last block. After stopping in the last block, the script blows one horn/whistle blast and turns off the light.For a series of short blocks the length needed to ramp up or ramp down is distributed over as many blocks as are needed. For short routes, the algorithm may decide the maximum speed cannot be achieved without over-running the last block. In this case, the max throttle setting is modified so ramp up and ramp down can finish without over-running the last block.
The elapsed times to traverse each block is computed from what is known about the engine's speed profile and the length of the path in each block. Note! if the route includes a Dark block, i.e. no occupancy detection, it is important it's block length is known since in this case, synchronization cannot be done.
Saving NX Warrants to make them Permanent
When the Run NX Warrant button is pressed and the NXWarrant starts its run, the warrant is listed in the Warrant List table with the name NX(address). If the table is not visible, it will be displayed. Notice that the Edit button label for the warrant is Save.If you press this button before the warrant completes, a Create/Edit Warrant Window for the NX Warrant will open. This window has a copy of the NXWarrant. After providing a name and any other information you want changed, press the Save button to make a permanent warrant.
Some Tips for Smooth Start Up and Slow Down
It is necessary to have a length specified for each path in a block. A rough estimate within 5% of the actual length is adequate. Each path inherits the length specified for the block, so it is only important to input a separate length for a path when its length is significantly less than the block length. Lengths can be set for OBlocks and for individual paths within a block in the CircuitBuilder Edit Path menu or in the OBlock tables.
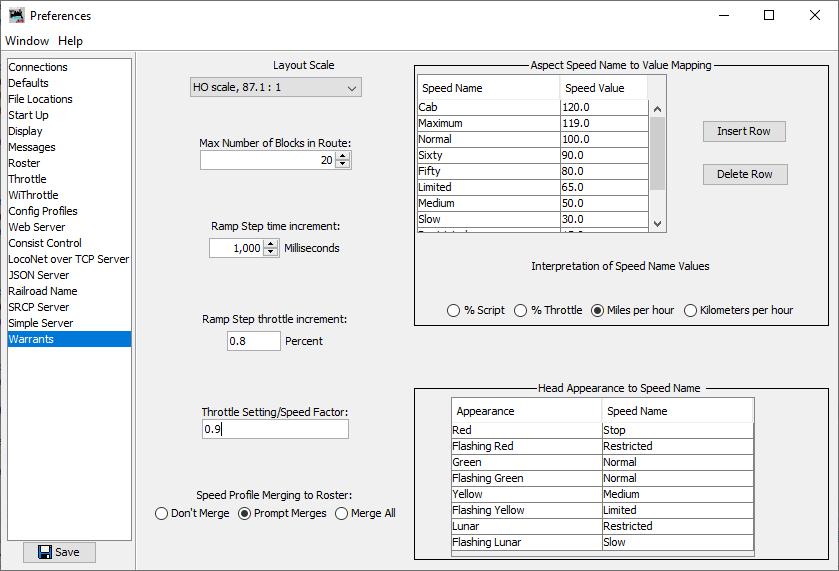
The algorithm calculates the speed changes using the the step intervals for time and throttle setting specified in Warrant Preferences. These are the values that give a prototypical look when changing speeds for signal aspects and starting and stopping. The Warrants pane at Edit->Preferences->Warrants is where this and other Warrant parameters can be set.
Warrant Preferences
From the general JMRI Preferences, select the Warrants tab and check the options set for:
- Layout Scale - Setting the modeling scale of your layout is essential so conversion to scale speeds is correct.
- The default search depth (Max. Number of Blocks in Route) as mentioned above when looking for routes.
- The value of the Throttle Setting/Speed Factor is used by Warrants when no Speed Profile is available.
- Ramp Step time increment and Ramp Step Throttle
Increment regulate the smoothness and prototypical look of speed changes.
For locos with no momentum, short times and smaller throttle increments make smoother ramps. For locomotives/consists with lots of momentum, longer periods should be used.
Note: The throttle increment for one step of a 128 step throttle is 0.00794. The defaults are set for a modest amount of momentum, i.e. perhaps less than prototype but visually OK. Observe how trains behave starting up and stopping with NX Warrants and adjust accordingly.