JMRI Remote Panels
JMRI displays panels via a web browser at the /panel relative URL.
Remote Panel URLs are:
- /panel
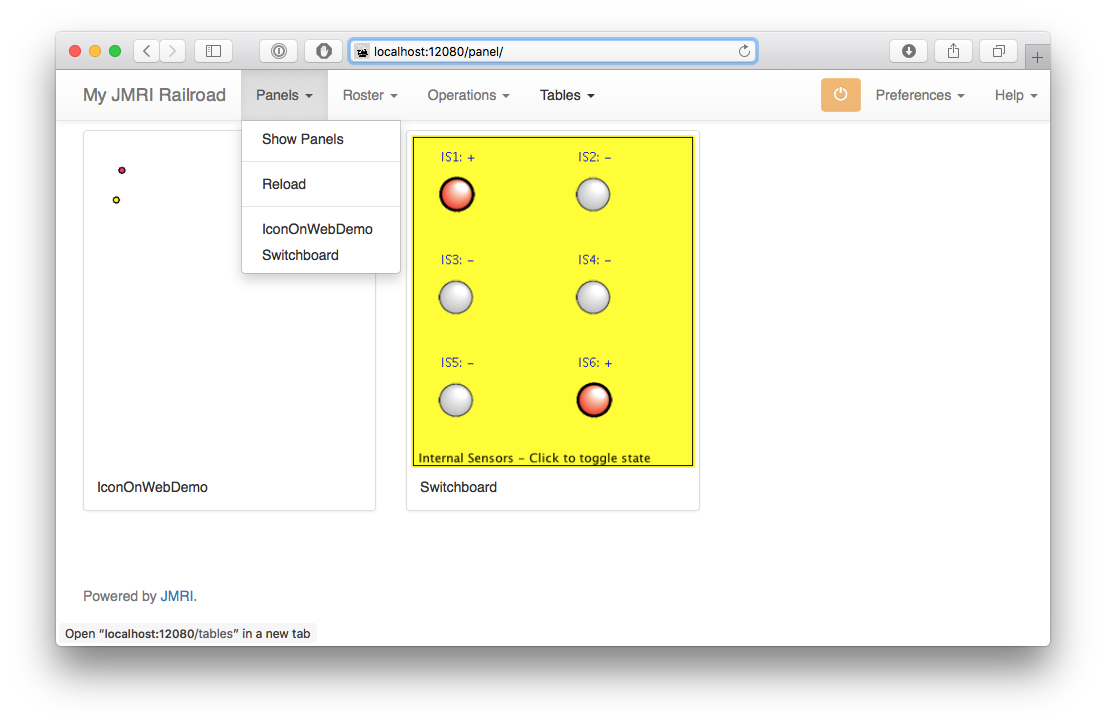
- Without any additional parameters, /panel lists the open JMRI panels, as shown
in the screen shot above (panels may be hidden in PanelPro, but they must be loaded to show
up).
Clicking or tapping on one of the listed panel names will open a functioning panel. - /panel?name=<type>/<name>
- Displays an open, operable panel. <type> is one of: Panel, ControlPanel, Switchboard or Layout.
- /panel/<type>/<name>?format=xml
- Retrieves a portable XML representation of the panel. <type> is one of: Panel, ControlPanel, Switchboard or Layout.
- /panel/<type>/<name>?protect=yes
- Displays a read-only representation of the specified panel.
Panel display requires a modern browser with HTML5 support including WebSocket. The JMRI web server's About page includes a test for this.
Technical Example: Behind the scenes of Web Server Panels
")
This chapter shows an overview of how JMRI Web Server operates between the JMRI application and the Web Browser to demonstrate what code is involved, using Panels as an example.
In part A we show at how a panel initially shows up in the browser of a (remote) user logged on to JMRI Web Server.
Part B focuses on the opposing flow of information. You will discover how user action in the browser is picked up all the way back to JMRI and even to the layout.
Some definitions- Web Server displays panels, roster engines, tables and Operations in the web browser, using a mix of XML, Javascript, jdom, json, jQuery and CSS.
- Each of these categories is displayed in a separate frame, accessible in the browser
via tabs at the top edge of the browser window: Panels, Throttle, Operations, Tables:

- Each category has its own JavaScript code file, e.g.,
/web/js/Panel.js, plus supporting "Servlets" to connect to JMRI, as documented in the Web Server Javadoc. (Note: The code is run from/web/js/, but the real source code is stored in/web/ts/to allow the use of compiled TypeScript)
A. From JMRI to the browser
We assume JMRI and Web Server are running and the user has a browser pointing to
http://localhost:12080 as set in JMRI Web Server preferences.
Configuration and current state of panel items is handled by the
jmri/jmrit/display/xPanelEditor.java code. This means that creating a panel and
items like Turnouts connected to the layout, and listening for changes has been completed
first in the JMRI application. A graphical control panel needs to be loaded in JMRI for it to
show up in the JMRI web browser drop down (it is OK if a panel is hidden in JMRI UI).

- To open a panel the User uses the mouse to click the "Panel" combo on the menu bar.
- The web browser responds by asking Web Server to produce the panel by sending a GET
request together with a
/panel/"name"URL. - This starts the
/web/js/panel.jsJavaScript code. - The main method in
panel.jsis$(document).ready(function() {(around line 2000).
It ends with a call to therequestPanelXML(panelName);method:
          141 var requestPanelXML = function(panelName) {

          142    $.ajax({

          143    type: "GET",

          144    url: "/panel/" + panelName + "?format=xml", [...]

          145    success: function(data, textStatus, jqXHR) {

          146    processPanelXML(data, textStatus, jqXHR);

          147    setTitle($gPanel["name"]); } [...]
Here, line 142 sends an AJAX (Asynchronous JavaScript And XML)GET XMLHttpRequestcode> for the panel to be retrieved by its name to the JMRI PanelServlet. - The connection between web server and JMRI categories is handled by
servlets in
JMRI/java/src/jmri/web/servlet/, pieces of Java code interacting with the web server. The extended HttpServletjmri/web/servlet/panel/AbstractPanelServlet.javalinks the web server requests to the information kept in Java. ThedoGet()HttpServer message calls inpanel.jsto answer the request. - In the case of Switchboards the
/jmri/web/servlet/panel/SwitchboardServlet.javacontains methods such as:String getPanelType()String getXmlPanel(String name)
          40 protected String getXmlPanel(String name) {

          41    SwitchboardEditor editor = (SwitchboardEditor) getEditor(name);

          42     Element panel = new Element("panel");

          43     panel.setAttribute("shape", editor.getSwitchShape());

          44     Element color = new Element("backgroundColor");

          45     color.setAttribute("red",
          Integer.toString(editor.getBackgroundColor().getRed()));

          46     [...] 47
              panel.addContent(color);
Line 45 allows us to later frompanel.jscall e.g.,
979 $("#panel-area").css({"background-color": "rgb(" + $widget.red + "," + $widget.green + "," + $widget.blue + ")"}); - From the Java code running JMRI, specific information is written out to an xml
"snapshot" for both the panel (JFrame) and the individual objects placed on that panel, so
called 'Positionables':
- The complete panel is "stored" by the
store(object)method injmri/jmrit/display/switchboardEditor/configurexml/SwitchboardEditorXml.java:
            41 public Element store(Object o) {

            42  SwitchboardEditor p = (SwitchboardEditor) o;

            43  Element panel = new Element("switchboardeditor");

            44  JFrame frame = p.getTargetFrame();

            45  panel.setAttribute("name", "" + frame.getTitle());

            46  panel.setAttribute("class",
            "jmri.jmrit.display.switchboardEditor.configurexml.SwitchboardEditorXml");

            [...]
followed by a for-each loop:
for (BeanSwitch sub : _switches) {
try {
Element e = ConfigXmlManager.elementFromObject(sub);
e.setAttribute("label", sub.getNameString()); - Additional properties of all BeanSwitches on the Switchboard panel are exported in
a for-each loop in
jmri/jmrit/display/switchboardEditor/configurexml/BeanSwitchXml.java:
            public Element store(Object o) {

              BeanSwitch bs = (BeanSwitch) o;

              Element element = new Element("beanswitch");

              element.setAttribute("label", bs.getNameString());

              [...]

            }
out.outputString(doc)in reply to the web server request. - The complete panel is "stored" by the
- To process the xml response returned for the
requestPanelXMLcommand, the JavaScript code in/web/js/panel.jscontains the function
processPanelXML($returnedData, $success, $xhr)(around line 160)
that renders from the xml data in$xmlan object-based web panel html, ready to forward to the browser and display client-side using CSS and HTML5.
Among a lot of other properties, the background color is set from thepanelattribute:
$("#panel-area").css({backgroundColor: $gPanel.backgroundcolor});
where$()invokes jQuery as a selector (a function that returns a set of elements found in the DOM of the web page).
After the attributes of the main panel such as color, size and position are copied from the xml, all individual elements in the panel xml are processed in a for-each loop, building a persistent array of$widgetarrays:
        236 $panel.contents().each(

        237   function() {

        238     var $widget = new Array();
In such an array the attributes of each (positionable) item are copied in 1-on-1 from the xml, filling the basic widget web object:
244 $(this.attributes).each(function() {

        245   $widget[this.name] = this.value;

246 }); - Next, every
$widgetarray if enriched by extra fields, either using attributes shared on the panel, like
666 var $cr = $gPanel.turnoutcirclesize * SIZE;
with attributes of one of the elements:1039 $widget['text8'] = $(this).find('inconsistentText').attr('text');
or with copies of other elements already present in the $widget array, for example:
        case "beanswitch" :

          $widget['name'] = $widget.label;
which creates a 'name' item in the array and copies in thelabelitem. - Next, the HTML is written:
        $("#panel-area").append("<div id=" + $widget.id + "r class='" +

$widget.classes + "' " + $hoverText + "></div>"); - The complete HTML "page" is sent out to user's screen as a structured but basically static visual, composed of graphical "objects" that will be updated via the server as needed at a later point in time when the status of one such item changes inside JMRI.
- Next,
panel.jsstarts up a process to send and listens for changes to each panel element (called "nodes" in xml speak).
The nodes in our example panel are called BeanSwitches. SensorIcons and LayoutTracks are similar nodes. Each element is assigned a$widgetvariable in/web/js/panel.js, to interact with the browser document object model (DOM) HTML5+ entities via jdom (Java-based document object model for XML), jQuery and JavaScript Object Notation (JSON).
To be able to keep a link to every graphical element displayed on the browser we mainly use<div/>s that the server will feed to the user's browser and using jQuery can be contacted by their unique ID. - From that moment,
panel.jsfollows interaction injava.src.jmrit.display.xPanelEditorand the separate PositionableItems like LayoutTurnout, CPE SensorIcon and Switchboard Beanswitch. - Now that the
$(document).ready(function()main method is running, it will listen for changes, and depending on the type (object) will startupdateWidgets(name, state, data), which in turn callssetWidgetState(widgetId, state, data)to update the shape displayed on screen, e.g., when a sensor on the layout changes state.
What to Code:
- Describe how to get your specific stuff out of JMRI and into the web server:
- Shared: create the
store(panel)method - Per item: add code in a
for-eachelement loop in the same method
- Shared: create the
- Describe how to fill the
$widgetsfor your items in theprocessPanelXML()function.
Where to Code:
- In
/jmri/jmrit/display/xEditor/configureXml/xEditorXml.java+ similar files for any special classes your panel type relies on. - In
/web/js/panel.js
B. From the browser to JMRI

Note: Web click events are only enabled if a panel is configured (in JMRI xPanelEditor) to allow control.
- To perform regular click-handling, a
mouseup()function is hooked up to widgets in/web/js/panel.js(around line 1120):- a state toggle function for all non-momentary clickable widgets:
$('.clickable:not(.momentary)').bind(UPEVENT, $handleClick); - Momentary widgets go active on
mousedown, and inactive onmouseup
- a state toggle function for all non-momentary clickable widgets:
- Sending commands to the JMRI items under control, and listening for changes to those
items in JMRI, is handled by the JSON WebSocket Server.
- User interaction in the browser is picked up via
UserClicked(object)and GET/POST HTTP messages. - When a
mouseClickEventis heard, the$handleClick(e)function inpanel.jscallssendElementChange($widget.jsonType, $widget.systemName, $newState), resulting injmri.setObject(type, name, state)forwarding to the JMRI system.
- User interaction in the browser is picked up via
- The
$handleClick(e)function inpanel.js(around line 1160) updates the widgets involved:- Text based widgets are told how to change the <div> item that's already displayed on screen: fetch them by their ID, update their contents e.g., show an ON label instead of OFF.
- Icon-based widget are redrawn to reflect changes to state or occupancy by drawing on the graphical "canvas"
- It is also possible to swap styles on a div using CSS, for example to change the
style of a widget from "css2" to a new style called "css4" (where 4 represents the
intvalue for Inactive and Thrown):
var $reDrawIcon = function($widget) {

              $('div#' + $id).css($widget['css' + $newState]);
web/css/panel.cssfile by he user's browser. - Via
sendElementChange(around line 1750) a call is made tojmri.setObject(type, name, state);, wherejmrirepresents the JMRI WebSocket on this server -
setObject()in/web/js/jquery.jmri.jsjQuery JavaScript Library instructs JMRI to set for example a Light to "On" via a Post message:
          jmri.setLight = function (name, state) {

            jmri.socket.send("light", { name: name, state: state }, 'post');

} - If properly connected, on the layout a light will start to light.
What to Code: Specify the response to user action by adding an
if(...) block to the $setWidgetState(id, newState, data) function
(near line 1570).
Where to Code: $handleClick() function in
jmri/web/js/panel.js
Conclusion
We hope the above example will help new developers understand which parts are required to
create and maintain web display for a panel type, and how each part is connected to display
stuff from JMRI in the web browser, and back.
As always, start small and check often!